Scan Configuration
The Scan Configuration allows you customize the Scanner UI that your user sees when using the Modal Flow or the QR Flow. The possible configuration settings are described below.
logoUrl
type: string optional: yes default: null
A url to an image with your company logo, to be shown on th explanation screen before scanning
Example value:
https://dyneti.com/wp-content/uploads/2019/11/fb-preview.jpg
userId
type: string optional: yes default: null
See User ID for details.
scanMetadata
type: {version: number, data: {string, any}} optional: yes default: null
See Scan Metadata for details.
showDynetiLogo
type: boolean optional: yes default: true
If set to true, it displays the Dyneti logo at the top of the modal.
showFirstSecondSideProgress
type: boolean optional: yes default: true
If set to true, we display a progress bar above the scan region that tells the end user which side of the credit card is currently being scanned.
showProgressBar
type: boolean optional: yes default: true
If set to true, we display a blue progress bar above the scan region that fills up as the scan progresses.
showExplanation
type: boolean optional: yes default: true
If set to false, the explanation screen will be skipped.
showResult
type: boolean optional: yes default: true
If set to false, the result screen will not be shown and the scan window will automatically close after a scan is complete.
Example value: true
showCancelButton
type: boolean optional: yes default: false
If set to true, display a button that will cancel the scan.
Example value: true
localization
type: object optional: yes
Allows customization of the text displayed throughout the scan.
Please see the Localization page for more details
Default values:
const localization = {
      explanationHeadline: "To continue, we need you to",
      explanationAction: "take a photo of your card",
      explanationPrepare: "Get your card ready",
      explanationPrepareInstructions:"In the next step, you’ll be asked to scan your card. The verification process is fast and takes just a few seconds.",
      explanationWhyHeadline: "Why we do this",
      explanationWhyReason: "This quick step helps us prevent fraud.",
      actionContinue: "Continue",
      actionRetry: "Retry",
      actionClose: "Close",
      scanHeadline: "Scan your card",
      scanInstruction: "Hold your card up to the camera so that the card number is visible",
      scanInstructionOtherSide: "Hold your card up to the camera to scan the other side",
      scanFirstSideScanned: "First Side Scanned",
      scanFlipYourCard: "Great! Now flip your card and scan the other side.",
      scanOtherSide: "Scan Other Side",
      stepFirstSide: "First Side",
      stepSecondSide: "Second Side",
      errorRetry: "Error please try again later",
      errorNoWebcam: "No webcam available",
      errorWebcamResolve: "Please enable a webcam and click retry",
      completeHeadline: "Scan complete",
      completeInstructions: "Thank you. You can close this window now for your verification results.",
      completeInstructionsQr: "Thank you. You can now go back to your other window.",
      wrongCardDetectedMessage: "Wrong card number detected. Scan card ending in {expectedLastFour}",
      rightCardDetectedMessage: "Scanning card starting in {expectedFirstSix} and ending in {expectedLastFour}",
      throbberText: "Analyzing...",
      fewDigitsSeen: "Please show the side with the card number to the camera",
}
Example value: true
showThrobber
type: boolean optional: yes default: true
If set to true shows a throbber in the scan region when DyScan is done processing frames and is analyzing the collected information.
toastTimeout
type: number optional: yes default: 5000
When a toast is invoked, this parameter determines how long the toast will be displayed for (in milliseconds)
promptIfFewDigits
type: boolean optional: yes default: false
Set to true if you would like us to remind users which side of the card to scan if we think they might be showing the wrong side to the camera.
suppressFirstSix
type: boolean? optional: yes default: null
Set to true to opt out of receiving the first six digits of the credit card number of a successful scan. If supressFirstSix is true for a successful scan, the scanResult object will include only the lastFour digits, the expirationDate (if found), and the stripeToken (if using generate-a-stripe-token-from-a-scan.md). For example,
{
  "lastFour": "4321",
  "expirationDate": "01/29",
  "stripeToken": "tok_example"
}
One can leave the option unset, or set it to false to receive the first six digits. The only difference is that when set explicitly to false, the option will show up in the Scan #options echoed back to you.
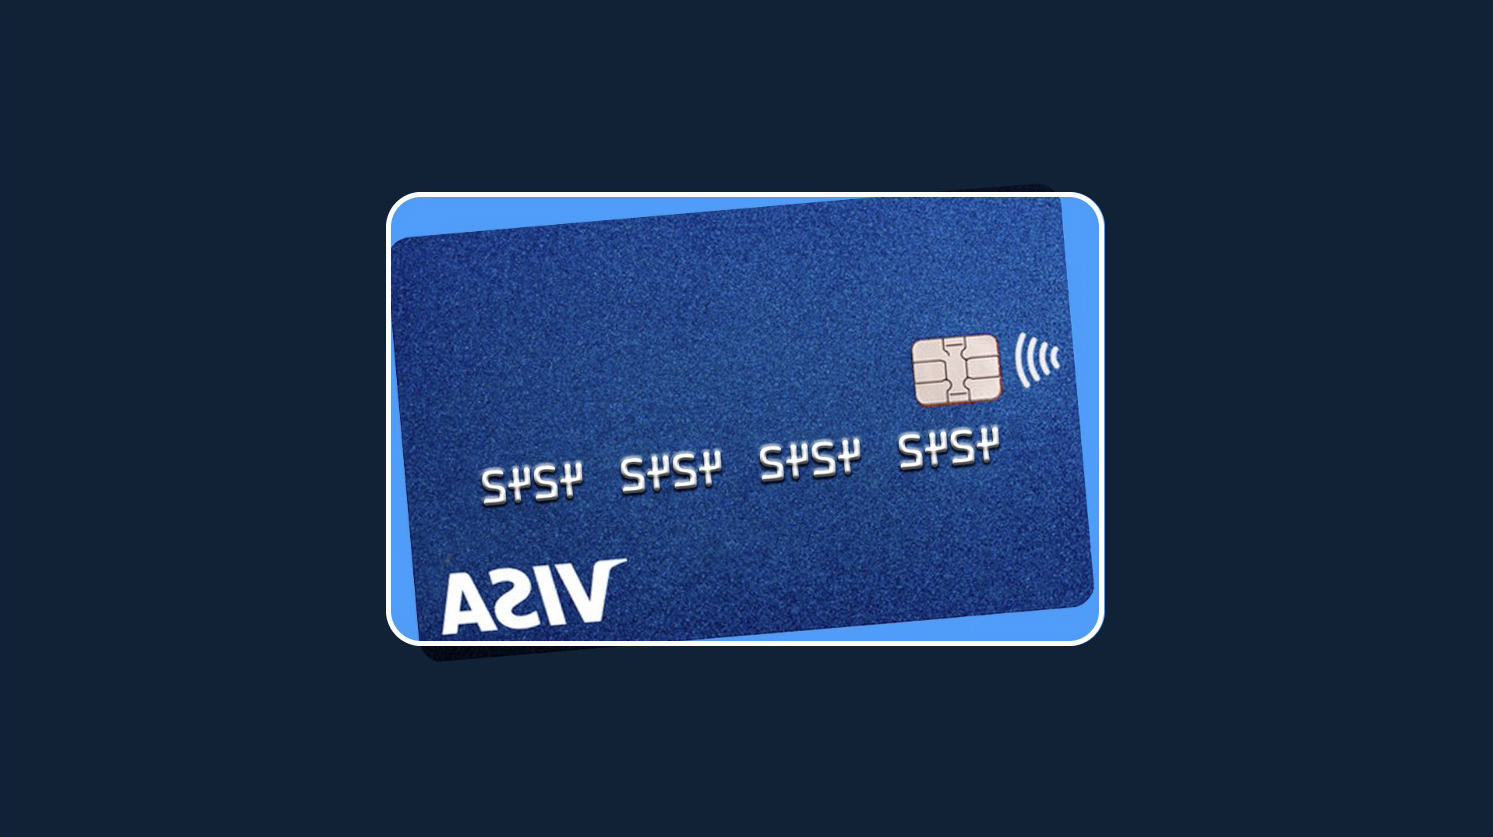
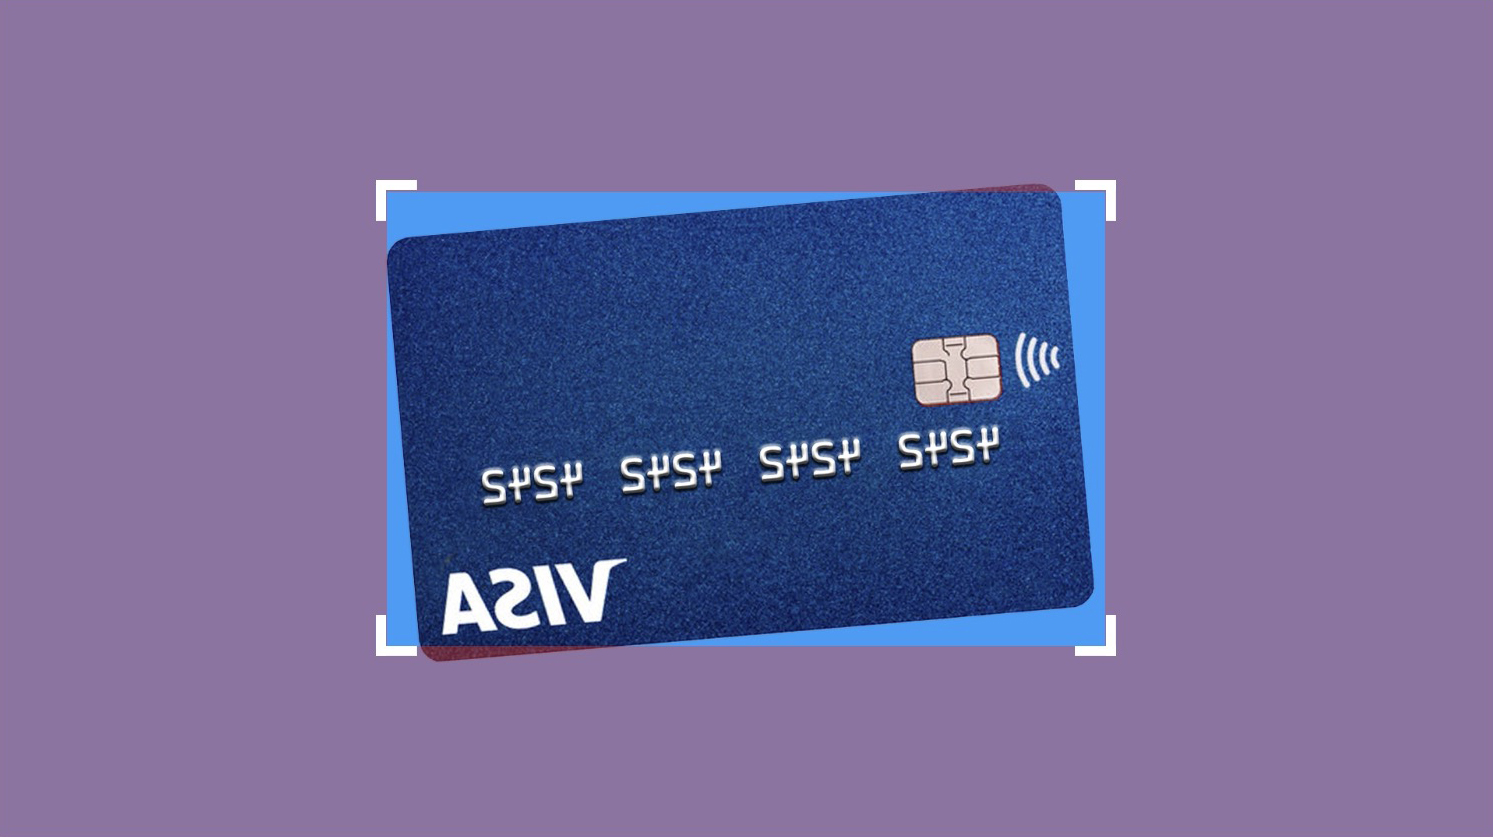
View-specific customizations
Configure the scan frame and the surrounding mask (overlay) to match your UI design.
You can:
- adjust the scan frame style (rounded corners / corner-only frame)
- control the mask color and transparency outside the frame
roundCorners
type: boolean optional: yes default: false
When true, the scan frame uses rounded corners that match the outline of a credit card. When false, the scan frame uses square (rectangular) corners.
expandCorners
type: boolean optional: yes default: false
When true, the scan frame is slightly offset from the edge of the surrounding mask (a small gap is visible). When false, the scan frame aligns exactly with the mask edge.
chopCorners
type: boolean optional: yes default: false
When true, only the corners of the scan frame are drawn. When false, the full scan frame outline is drawn.
maskColor
type: string optional: yes default: #00000080
Sets the color and transparency of the mask outside the scan frame.
Use 8-digit hexadecimal RGBA notation: #RRGGBBAA. Example: #00000080 (the default) corresponds to black with ~50% opacity.
Recommended combinations
For the best user experience, we recommend one of the following presets:
-
Credit-card outline (left):
roundCorners = true,expandCorners = false, andchopCorners = false -
Corner markers (right):
roundCorners = false,expandCorners = true, andchopCorners = true